+86-17692703999
+86-17692703999 No. 6, West Side Auxiliary Road,
Sunshine Street, Linxi County, Xingtai
City, Hebei Province
Sunshine Street, Linxi County, Xingtai
City, Hebei Province

Views: 0 Author: Site Editor Publish Time: 2026-05-25 Origin: Site

You can change an excavator bushing safely if you follow steps. Use good parts to make the job better. The Caterpillar OEM 2417381 Excavator Bucket Bushing works well. It helps your excavator last longer and work better.
Good bushings keep important parts safe. They handle tough jobs and help your machine last longer.
Strong bushings made from hard steel stay accurate. They also stop parts from wearing out fast.
If you use parts that are not OEM, your warranty might not cover damage.
Changing bushings makes your machine work better and saves money on repairs. This guide shows you how to do it safely and well.
Get ready before you work on your excavator. Being prepared keeps you safe. It also helps you finish faster. This guide gives you helpful tips for a smooth job.
Gather all your tools and materials first. Here is a simple list to use:
OEM bushings like the Caterpillar 2417381 for safety and reliability
Pin removal tools
Hydraulic puller or manual press
Hammer and punch set
Cleaning brushes and rags
Lubricants and sealants
Measuring tools for checking clearances
Line boring equipment if needed
The right tools and good bushings help you work safely. Matching bucket pins and bushings is important. It makes your machine last longer and work better.
Wear the right personal protective equipment (PPE) every time. This means:
Safety glasses
Gloves
Steel-toe boots
Hearing protection
High-visibility vest
Keep your workspace clean and clear. Use cones or tape to mark the area. Only trained people should be in the work zone. Learn the right steps with training. Get more training if you see unsafe actions or after an accident.
Make sure your excavator is stable before you start. Park it on flat ground. Lower the bucket and arms. Turn off the engine and take out the key. Block the tracks or wheels so it does not move. Disconnect hydraulic lines if needed. These steps keep you and your machine safe.
Tip: Always look for leaks or loose parts before you start. Check your machine often and use enough grease to stop problems early.
Follow these tips to make bushing replacement safe and easy.
You need to know when your excavator bushing is worn out. Worn bushings can cause many problems. Look for these signs:
You notice the arm, boom, or bucket feels loose or has extra play.
The machine makes squeaking, grinding, or knocking noises.
The bucket or boom looks misaligned.
You see grooves, cracks, or other visible damage on the bushings.
The excavator does not move as smoothly or loses precision.
You spot grease or oil leaking near the pin locations.
It becomes harder to control attachments or tools.
If you see any of these issues, your bushings may need attention.
Regular checks help you catch problems early. Most contractors inspect bushings every 250–500 hours. Many replace critical joints each year to avoid sudden breakdowns. Use these steps for a good inspection:
Look closely at the bushings for grooves, cracks, or bent metal.
Move the bucket and arms to feel for looseness or extra movement.
Listen for odd sounds during operation.
Check for oil or grease leaks around the pins.
Use measuring tools to check clearances. If you find too much space, you may need line boring to restore the fit.
Soil and weather can speed up wear. Wet soil sticks to metal and causes more damage. Hot weather can soften steel, while cold weather makes it brittle and reduces lubricant flow.
Replace bushings when you see clear signs of wear or damage. If you ignore these signs, you risk bigger problems. Worn bushings make the hydraulic system work harder, which uses more fuel and slows down your work. If pins wear over 30%, your machine can lose up to 20% efficiency. One bad part can cause others to fail, raising repair costs. Poor track tension, rough terrain, lack of lubrication, and improper operation all lead to early failure. This complete guide helps you avoid these costly mistakes and keep your excavator running strong.
You must use safe methods when you remove old bushings. Start by disconnecting all hydraulic lines and attachments. This step prevents sudden movement and keeps you safe. Lower the bucket and arms to the ground. Turn off the engine and remove the key.
You can choose from several removal methods. The right method depends on your machine size and the condition of the bushings. Here are some common ways to remove digger bushes:
Use a hammer and bar for small excavators. This works well if the bushings are weak or worn out.
Weld a stud into the bushing. This gives you a strong point to hit with a bar and knock the bushing out.
Weld around the inside of the bushing for large bushings. As the weld cools, it shrinks the metal and loosens the bushing.
Cut a slot in the bushing wall with an oxy-acetylene torch. This shrinks the bushing and makes it easier to remove.
Use a hydraulic press or puller. This method gives you control and power, making it safe and efficient.
Tip: Always check the service manual for your excavator before you start. Follow the steps for your model to avoid mistakes.
You need the right tools to replace pins and bushes without causing damage. The tools you choose depend on the size of your machine and the type of bushing.
Hammer and bar: Use these for smaller machines. Make sure the bar fits well—bigger than the inside of the bushing but smaller than the outside.
Stepped tool: Professionals use this tool for different bushing sizes.
Stud welder: Weld a stud to the bushing to help with removal.
Hydraulic press: This tool gives you the force and control you need. It works well for large bushings and helps avoid damage.
Oxy-acetylene torch: Use this to cut a slot in the bushing wall if other methods do not work.
Bushing puller: This tool helps you remove the old bushing. You can apply heat if the bushing is stuck.
Support frame or hydraulic jack: These tools keep the machine steady during the process.
Copper rod or nylon hammer: These tools protect the housing from damage.
Grease or high-temperature butter: Use these to help slide the bushing out.
A hydraulic press with a hollow cylinder works best for large bushings. It gives you even pressure and reduces the risk of damage. Using a press also makes replacing pins easier and safer.
You must protect the bushing housing during removal. Damage to the housing can lead to costly repairs and may require line boring to fix. Here are some tips to avoid problems:
Always disconnect hydraulic lines and attachments before you start.
Support the bucket and arms so they do not move.
Use the right size tools for your bushings.
Do not use too much force. If the bushing does not move, try another method.
Apply heat carefully. Too much heat can warp the housing.
Use a copper rod or nylon hammer to avoid scratching the metal.
Clean the area before and after you remove the bushing.
Note: If you see cracks or deep grooves in the housing, stop and inspect the area. You may need to repair the housing before you replace digger bushes or start replacing pins.
You can keep your excavator in top shape if you follow these steps. Careful work now will save you time and money later. Always use safe methods and the right tools when you remove old bushings.
You must clean the bushing housing before you install new parts. Dirt, old grease, and debris can cause problems if left inside. Start by removing all loose material with a brush or rag. Use a wire brush to scrub away any buildup on the metal surface. Make sure you reach every corner and edge.
Remove dirt, dust, and old grease.
Use a wire brush or cleaning tool for tough spots.
Wipe the area with a clean rag.
Check for any leftover debris.
A clean surface helps the new bushings fit well and work smoothly. You lower the risk of early wear when you keep the area clean.
After cleaning, look closely at the housing. Check for cracks, deep grooves, or signs of wear. Use a flashlight to see inside the hole. If you find damage, you may need line boring to fix the shape. This process restores the hole to the correct size.
Tip: If you see any damage, stop and repair it before moving forward. A damaged housing can cause new bushings to fail quickly.
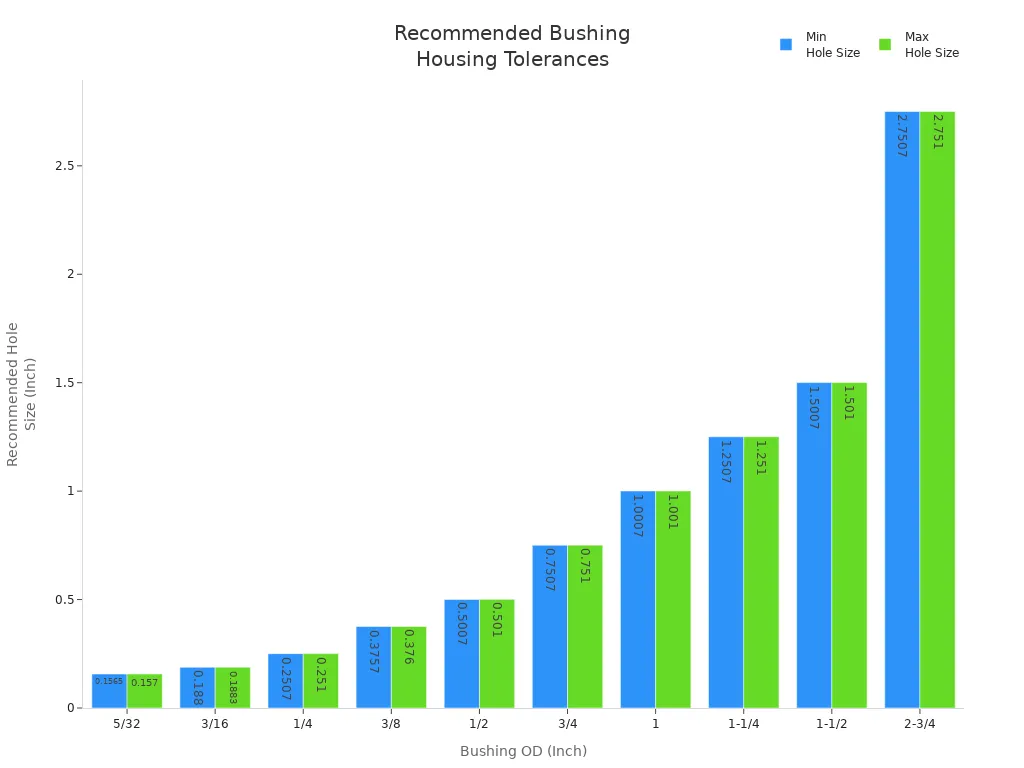
You need to prepare the housing for the new part. Start by measuring the hole with a caliper or gauge. The hole must match the recommended size for your bushing. Use the table below to check the correct tolerances:
Bushing OD (Inch) | Recommended Hole Size (Inch) |
|---|---|
5/32 | .1565 - .1570 |
3/16 | .1880 - .1883 |
1/4 | .2507 - .2510 |
3/8 | .3757 - .3760 |
1/2 | .5007 - .5010 |
3/4 | .7507 - .7510 |
1 | 1.0007 - 1.0010 |
1-1/4 | 1.2507 - 1.2510 |
1-1/2 | 1.5007 - 1.5010 |
2-3/4 | 2.7507 - 2.7510 |
Check the hole for burrs or sharp edges. Remove them with a deburring tool. Test fit the new bushing to make sure it slides in smoothly but does not wobble. When you follow these steps, you help your excavator run better and extend the life of your bushings.
You want your excavator bushing to last a long time. You also want to avoid problems during installation. Follow these best practices to get the job done right:
Gather all your tools and safety gear. Make sure you have a hydraulic puller, jacks, and gloves.
Check that your machine is stable. Disconnect the power and keep the area safe.
Clean the housing where you will put the new bushing. Remove all dirt and grease.
Apply a thin layer of grease to the inside of the housing. This helps the new bushing slide in smoothly.
Align the new excavator bushing with the hole. Use a press or puller to push it in slowly and evenly. Do not hit it with a hammer.
Install the new pin if needed. Check the clearance between the pin and bushing. The fit should be snug but not too tight.
If you see any resistance, stop and check for burrs or debris. Forcing the bushing can cause damage.
Tip: Always use the correct size bushing for your machine. If the hole is out of shape, use line boring to fix it before installation.
You need to make sure the new bushing fits perfectly. A good fit helps with eliminating play in the bucket and arms. Here are some tips and tricks:
Measure the inside diameter of the housing and the outside diameter of the bushing.
The bushing should slide in with a press fit. It should not wobble or fall out.
After installation, move the bucket and arms by hand. You should feel smooth movement without extra play.
If you notice any looseness, check the measurements again. You may need to repeat the installation or use a different bushing.
A proper fit is key for eliminating play and keeping your excavator working well.
After you finish the installation, you must check your work. These steps help you stay safe and keep your machine running smoothly:
Test the movement of the bucket and arms. Move them slowly at first.
Listen for any strange noises like squeaks or knocks.
Watch for smooth action. The parts should move without sticking.
Check for leaks around the new bushings and pins.
Run the excavator at idle speed. Apply a small load and watch for problems.
Note: If you hear odd sounds or see leaks, stop and inspect the area. Fix any issues before you return the machine to full use.
Many people make mistakes during installation. You can avoid these common problems:
Do not skip cleaning the housing. Dirt can ruin your new bushing.
Never force the bushing into place. Use steady pressure with a press or puller.
Do not ignore signs of a poor fit. Always check for eliminating play.
Avoid using the wrong size bushing or pin. This can cause fast wear.
Do not forget to check for damage after installation. Early checks save you time and money.
Tricks: Keep a log of your installation steps and measurements. This helps you track what works best for your machine.
You can use these tips and tricks to make your excavator bushing installation safe and efficient. Good installation means less downtime and better performance for your excavator.
You can change bushings safely if you follow each step in this guide. Good OEM parts like the Caterpillar 2417381 help your machine last longer. They also stop you from losing time and money. Always use tips for line boring and putting in new bushings. Follow OEM rules to save money on repairs and keep your warranty. Here are some things to remember:
Wear the right PPE
Clean and look at all parts
Use the right tools to take out and put in bushings
Check how the parts fit and move after you finish
Tip: Check your excavator often to keep it working well.
You should check bushings every 250 to 500 hours of use. Look for signs of wear or movement. Early checks help you avoid bigger problems and keep your machine working well.
Line boring is a process that fixes worn or damaged holes in your excavator. You need it when the housing for bushings becomes out of shape. This step helps new parts fit tightly and last longer.
You can use basic tools for small machines, but special tools like a hydraulic press make the job safer and easier. Using the right tools helps you avoid damage and saves time.
Keep bushings clean and well-lubricated. Check for wear often. Use high-quality parts and follow the correct steps during installation. These tips help you get the most life from your equipment.
You can use heat or a hydraulic puller to loosen stuck bushings. Always support the bucket and arms. Take your time and follow the service manual for your machine. These tricks make the job smoother.