+86-17692703999
+86-17692703999 No. 6, West Side Auxiliary Road,
Sunshine Street, Linxi County, Xingtai
City, Hebei Province
Sunshine Street, Linxi County, Xingtai
City, Hebei Province

Views: 0 Author: Site Editor Publish Time: 2026-05-28 Origin: Site

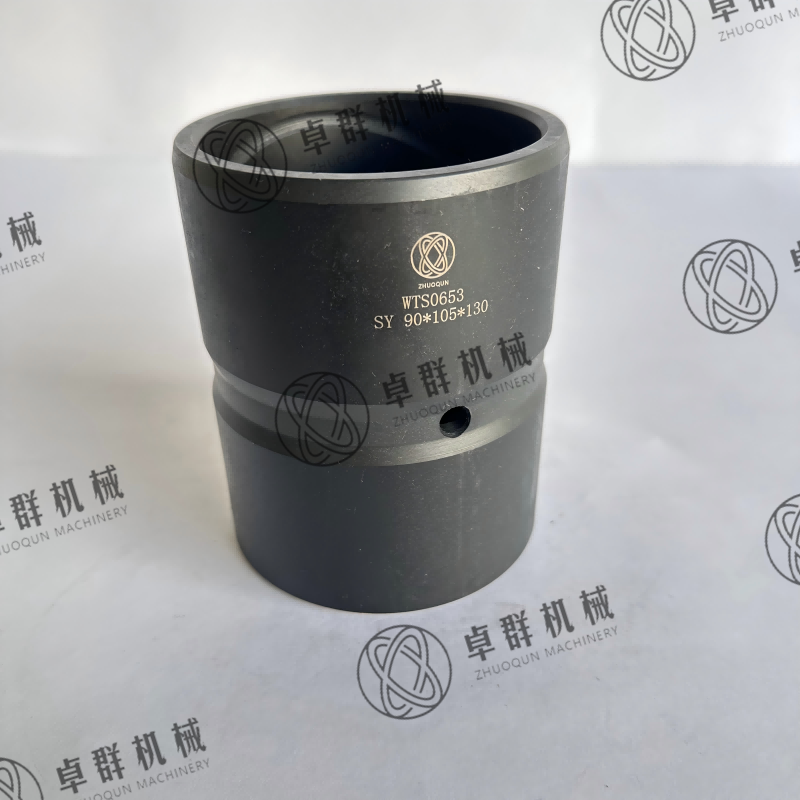
You can change a heavy equipment bushing outside if you have the right tools and follow steps carefully. If you use a good bushing like the Sany A820202003017, your machine will last longer and work better. This bushing is made with strong materials like:
High-quality carbon structural steel for extra toughness
45 steel for more strength and hardness
40Cr for hard jobs
42CrMo for really tough work
GCr15 for heavy loads and lots of rubbing
These materials help your equipment work well and not break down.
Heavy equipment bushings are found in machines like excavators and loaders. They look like hollow tubes and fit inside moving joints. The Sany A820202003017 bushing is one example. It is made from strong steel and lasts a long time. There are different types of bushings for construction machines:
Oilless bushings: These need less care and work well at pivot points.
Plain bushings: These are simple tubes for lighter jobs.
Flanged bushings: These have a rim for extra support.
Spherical bushings: These let parts move in many directions.
Split bushings: These are easy to put in and take out.
Composite bushings: These use mixed materials for better results.
Bushings wear out over time. You can replace them when they get damaged or worn out.
Bushings help machines work smoothly. They connect moving parts like the boom and bucket. When you use your machine, pins spin inside the bushings. Oil or grease inside the bushing helps stop friction and wear. This keeps your excavator working well and stops damage. The Sany A820202003017 bushing takes in shock and keeps parts lined up. You feel less shaking and more comfort. Bushings protect the machine from rough moves and help it last longer.
Tip: Always pick strong bushings to avoid breakdowns and save money on repairs.
Check your bushings often. Worn bushings can cause trouble. Watch for these signs:
Sign of Wear | Description |
|---|---|
Too much space or hard to move | The joint feels loose or stiff. |
More noise or shaking | You hear squeaks, grinding, or knocking. |
Parts not lined up or stuck | Parts look crooked or get stuck. |
Damage you can see | You see lines, cracks, or breaks. |
Not working as well | The machine lifts or digs worse. |
Oil leaking | Grease or oil leaks near the pin. |
If you see these signs, check the bush housing. A worn bush housing can cause breakdowns and cost a lot to fix. Change bushings fast to keep your machine safe and working well.
Before you start, gather all the items you need. You should have a socket set, torque wrench, jack, jack stands, and a bushing removal tool. Lay out your new bushing and make sure it matches your machine. Keep your service manual close by. This manual gives you the right torque numbers and special notes for your equipment. Missing a tool or part can slow you down and make the job unsafe.
Safety comes first. Always wear safety glasses to protect your eyes from flying debris. Put on work gloves to keep your hands safe from sharp edges and hot surfaces. If you work with high voltage systems, you may need a High Voltage Level 3 Certification. This training helps you handle electric parts safely. If you do not feel sure about your skills or tools, ask a trained mechanic for help. A poorly installed bushing can cause steering or suspension problems.
Tip: Never skip safety steps. Protect yourself and those around you.
Set up your work area before you begin. Park your machine on a flat, hard surface. Engage the parking brake. Place wheel chocks behind the wheels to stop any movement. Make sure the area is clean and free of clutter. Good lighting helps you see small parts and avoid mistakes. Keep your tools and parts within easy reach. Having everything ready makes the job smoother and safer.
You need to reach the heavy equipment bushing before you can remove it. Start by making sure your machine is secure and stable. Lower the boom or arm to the ground. Remove any covers or guards that block your access. Use your service manual to find the exact location of the bushing.
Once you see the bushing, check it closely. Look for signs of a bushing stuck in place, such as rust, dirt, or damage around the edges. Move the joint back and forth. If you hear grinding or see the joint move too much, the bushing may be worn out. You should also check for leaks or cracks. If you see any of these problems, you know it is time to replace digger bushes.
Tip: Take a photo before you start. This helps you remember how everything fits together.
You have several ways to remove digger bushes in the field. The right method depends on your tools and the size of your machine. Here are some field-proven methods:
Use brute force. Hit the bushing with a hammer and bar. This works best on small machines.
Weld a stub inside the bushing. This gives you something to grab and pull out.
Weld around the edge of the bushing. The heat makes the bushing shrink, so it comes out easier.
Cut a slot in the bushing with an oxy-acetylene torch. Be careful not to cut the machine arm.
Use a hydraulic press or puller tool. This is the safest way, but you may not always have one in the field.
Sometimes, you find a bushing stuck because of rust or dirt. If this happens, spray some penetrating oil and let it soak. Try to move the bushing again. If it still will not move, use more heat or try another method from the list above.
Note: Always wear gloves and eye protection when you remove digger bushes. Hot metal and sparks can cause injuries.
After you remove the old heavy equipment bushing, you must clean the housing before you install a new one. Use a wire brush or cloth to wipe away all grease, dirt, and metal shavings. Make sure you remove every bit of old grease and debris. If you leave anything behind, it can cause a bushing stuck during installation or damage the new part.
Check the housing for burrs or rough spots. Use a file or sandpaper to smooth them out. A clean and smooth surface helps the new bushing fit well and last longer. If you see any cracks or deep scratches, you may need to repair the housing before you replace pins or bushings.
Field conditions can make this step harder. Cold weather can freeze moisture inside the housing. Dirt and dust can get into the joint. Try to keep the area as clean as possible. If you work in very cold weather, let the parts warm up before you install the new bushing. This helps prevent problems like a bushing stuck or false readings if you test the part.
Tip: Dispose of old bushings in a safe way. Many recycling centers take metal bushings. This helps protect the environment and keeps your worksite clean.
Now you are ready to install the new heavy equipment bushing. Careful cleaning and inspection help your machine run smoothly and avoid future problems.
You must always use the correct bushing for your machine. The Sany A820202003017 fits the Sany 215 excavator and gives you the best performance. Using the right part helps you avoid problems with fit, durability, and warranty. If you use non-OEM bushings, you might lose your equipment warranty. Always check your manual before you start.
Follow these steps to install a new bushing in a bucket link:
Check that the housing bore is clean and smooth. Remove all dirt, grease, and burrs.
Use a gauge to confirm the bore size matches the H7 tolerance grade. This ensures a proper fit.
Apply a thin, even layer of lubricant to the outside of the new bushing. This reduces friction during installation.
Align the bushing with the centerline of the housing bore. If you install more than one, make sure the joints line up.
Use a guide mandrel to keep the bushing straight. This tool helps you press the bushing in evenly.
Use a hydraulic or mechanical press to push the bushing into place. Do not use a hammer. Hammering can crack or chip the bushing.
Stop when the bushing sits flush with the housing. Do not force it past the edge.
Tip: Always double-check the part number before you replace bushes in a bucket link. The wrong bushing can cause early wear and extra repairs.
After you install the new bushing, you need to check the fit and alignment. This step helps you avoid problems later.
Look at the lead-in chamfer. It should have a 20-degree angle and a depth of 1-2mm. This helps guide the bushing into place.
Make sure the bushing sits straight and does not tilt. Use a straight edge or a dial gauge to check alignment.
If you install more than one bushing, check that the butt joints line up.
Lubricate the inside of the mounting hole and the outside of the bushing. This prevents damage and helps with final fit.
Insert the ground lead of the bushing first. This makes alignment easier.
Rotate the bushing by hand. It should move smoothly without sticking.
Note: If you feel resistance or see gaps, remove the bushing and check for dirt or burrs. Clean and try again.
Before you finish, inspect your work. Many people make mistakes during installation. You can avoid these problems by following best practices.
Mistake | Result | Solution |
|---|---|---|
Hammering during installation | Cracked or chipped bushing | Use a hydraulic press or thermal fit method |
Dirty or rough housing bore | Poor seating, misalignment, vibration | Clean and polish bore before installation |
Overheating the housing | Thermal expansion cracks or distortion | Do not exceed 300°C and heat evenly |
Incorrect tolerance fit | Loose bushing or premature wear | Check with gauge before installation |
No lubrication | Friction and surface scoring | Apply thin oil film before inserting shaft |
After you finish, grease the new bushing. Use only a thin, even layer. Too much grease can cause hydraulic lock or make the bushing move out of place. Grease the sliding faces and the contact surface of the housing recess. If you also do a seal replacement, check that the seals fit tight and do not leak.
Tip: Always inspect the area for leftover tools or debris. A clean worksite helps prevent accidents and keeps your equipment running well.
You have now completed the installation. If you follow these steps, your new bushing will last longer and your machine will work better. Regular checks and proper seal replacement keep your equipment in top shape.
You can keep your equipment working well if you follow each step. Good bushings help your machine last longer and work better. Check your bushings often so you find problems early.
Look at bushings every 100 hours the engine runs.
Do daily checks to find issues and keep parts oiled.
Taking care of bushings makes parts stronger. It lowers repair costs and helps your equipment last longer. Always read your manual and ask an expert if you need help.
You should check bushings every 100 hours of machine use. Daily checks help you spot problems early. Regular inspection keeps your equipment safe and working well.
You need a socket set, torque wrench, jack, jack stands, and a bushing removal tool. Always keep your service manual nearby for guidance.
You should not reuse old bushings. Old bushings can have hidden damage. Always install a new, high-quality bushing for best results.
The Sany A820202003017 uses strong steel like 45#/40Cr/42CrMo. This material resists wear and absorbs shock. You get better performance and longer service life.
Mistake | Problem caused |
|---|---|
Misalignment | Early wear |
No lubrication | Friction and damage |
Hammering into place | Cracks or chips |
You should always follow the correct steps to avoid these issues.